Sunday, June 27, 2010

VICTORY!


As Johnny Drama would say, VICTORY!!!!
I got my acceptance letter for the Physical Therapy Assistant program here in Nevada.  The school only accepts 12 students a year so I've been working my tail off to get accepted.  I was so excited when I opened my letter and saw congratulations written in bold font that I screamed.  Things are finally falling into place.  

If you don't know who Johnny Drama is or have never heard of Viking Quest, you clearly live in a cave and need to watch the HBO original series, Entourage.

Friday, June 25, 2010

Ka-Chow

We have officially lived in Las Vegas for a year now!  I thought I would celebrate the occasion by posting pictures of our cross-country drive last summer.  We drove my car from Charlotte, NC to Las Vegas, NV in four days.  And by we, I mean I drove the whole way and Nick was a wonderful co-pilot.  That's not sarcasm there either.  I get car sick easily so I decided it was best for me to drive and for him to read a book and navigate.  You know, it's easy for me to get lost when driving 2500 miles on the same road with no turns.

We stopped in Arizona at the Meteor Crater.  (That would be the giant hole behind us in case you were wondering.)
The meteor crater was formed 50,000 years ago by the meteorite Canyon Diablo Meteorite.  The crater is 4,000 feet in diameter and 570 feet deep.  The picture doesn't do it justice.  Trust me, it's MASSIVE!  If you are ever driving through Arizona, about 35 miles East of Flagstaff, check out the meteor crater.
It is privately owned so you will have to pay a fee to view the crater.  I have no idea how much it costs because we were able to see it for free because we were on military orders.

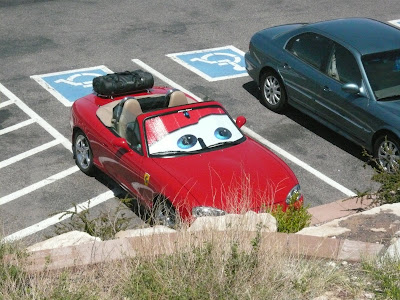
These pictures of a giant hole are probably pretty boring so I thought I'd share this picture of the awesome car we saw in the parking lot outside the meteor crater.  I never thought I'd meet a celebrity as famous as Lightning McQueen from the Disney Pixar movie, Cars.  Ka-Chow!

Wednesday, June 23, 2010

I made this baby card and matching envelope and gift bag for a mom-to-be.  Too cute!

How much is that doggy in the window?

A cute card I made with an even cuter puppy on the outside.  It opens to reveal  a red card on the inside with a black textured stripe.  I love making textured paper.  It really makes the cards pop!

I can make invitations and cards for any occasion.  Please let me know if you have any requests and I can give them a whirl.

I feel like chicken tonight, like chicken tonight!

I like to steer clear of red meat for health reasons but sometimes eating chicken can get boring.  Chicken is easy to cook but you have to really work some magic with the spices to prevent it from being bland.  I LOVE the following recipe and my mom just tried it out and she enjoyed it as well.  It combines three of my favorite ingredients, garlic, balsamic vinegar and mushrooms! Enjoy!

Balsamic Chicken Breasts:
Ingredients:
Two boneless skinless chicken breasts
6 ounces fresh sliced mushrooms ( I love mushrooms so I throw in a lot more than six oz.)
1 Tablespoon olive oil
3 cloves minced garlic
2 Tablespoon balsamic vinegar
1/4 cup and 2 Tablespoons chicken broth 
1/2 bay leaf
1/8 dried thyme
1 1/2 teaspoons butter

-Season chicken with salt and pepper.  
-Saute chicken in oil until browned on one side.  Approximately three minutes.  Add garlic, turn chicken; scatter mushrooms on top of chicken.  
-Continue frying, shaking the skillet and stirring mushrooms.  
-Cook for about three minutes, then add vinegar, broth, bay leaf, and thyme.  
-Cover and simmer ten minutes over medium-low.
-Transfer chicken to a serving platter, cover.
-Continue simmering sauce uncovered over medium-high for seven minutes.
-Swirl in butter. 
-Pour sauce over chicken and serve.

Say Cheese! (Warning:Graphic Surgery Photos Below)

My smile before my surgery.  Unfortunately, my braces were too much trauma for my body to handle.  My number seven tooth was forced to move too much and it caused the tooth to reabsorb itself.  Even though it looks healthy from the outside, it has been decaying on the inside. (As opposed to a cavity which is decaying from the outside in.)  I had to have the tooth removed and an implant put in it's place.  I will warn you that the next picture might gross some people out.

The tooth has been removed and the implant has been drilled into my bone.  You can see the screw that attaches to the implant where my tooth used to be.
I have been in so much pain the past 24 hours that I thought I'd share these photos.  I also wanted to share them to remind everyone to take care of their teeth.  I took care of mine and unfortunately re-absorption is the result of trauma but if you have a severe cavity, an implant can end up being the only solution.

The implant, which you can't see because it's drilled into my bone, takes six months to heal.  Once six months have passed, I will have a permanent abutment (post) and a permanent crown placed on the post.  I'm pretty excited to get my pretty new tooth!  My doctor assures me it'll be prettier than the original tooth.  In the meantime, I have a temporary post and crown that doesn't serve much of a purpose except to not leave a gap in my teeth.  I can't chew with it or bite into food in that area.

I hope I haven't grossed everyone out.  I think this kind of thing is interesting and I know that my friends that are in the health field will as well.  So if you see me in the near future, do not stare directly at my swollen and bruised face.

My Sweet Pico


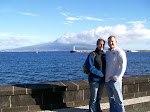
I miss living on our island in the sun.  Nick and I were fortunate enough to travel to some of the other Azorean islands while we were stationed at Lajes.  The Azores are an island chain located 900  miles off the coast of Portugal.  This is actually a picture of Pico, one of the islands.  We rented a house on Pico with friends and stayed there over a long weekend.  We took a boat over to an island that's close by, Faial, and that's where this picture was taken.  It looks like the volcano is smoking but it's not, those are just clouds.  This second picture was taken on Pico and the island in the distance is Faial.  Kind of neat to see the view from both perspectives.  We found a fabulous restaurant on the island called My Sweet Pico.  They had fantastic food and even yummier desserts.  Crepes!  Oh, and the giant beers weren't so bad either.


Monday, June 21, 2010

More Cards!

Cute little card I made for my friend having a baby.  I love the textured paper I made with the circles.
This is a small baby card that I made that's meant to attach to a gift.  It flips open to the side to reveal more baby pattern and a spot to write a small note to the new mother.


A fun thank you card that I made with textured paper and stamps.  So fun!

Sunday, June 20, 2010

Happy Father's Day

Happy Father's Day to my amazing dad! I love you very much!


Friday, June 18, 2010

Hard H20

Hard water is a serious problem here in Las Vegas.  No matter how many times I scrub my dishes, I can't get all of the hard water stains off of them.  The same goes for the showers, toilets, and sinks.  I'm embarrassed when we have guests over because it actually looks like we didn't even wash some of the dishes.  You can buy a water softening system for the house but of course ours didn't come with one and it's expensive to install.  I didn't realize how bad the hard water stains were in our bathroom shower until I took this picture of the dogs playing in the shower.  When my very handsome handy man gets home, I will have to get him to install me a water softener for Christmas.  :)

Bristol

Here's my handsome boy Bristol.  I figured out why he's been eating laying down.  It's probably got something to do with the fact that he's a fatty.  He weighed in at 29 pounds!  He needs to lose about five pounds.  He's my little heifer.

Thursday, June 17, 2010

Her Name was Lola


Pictures of the Paris hotel and casino on the Las Vegas Strip.  You can have dinner at the top of the replica of the Eiffel Tower.  It's much smaller than the real Eiffel Tower in Paris.  You can also shell out a ridiculous amount of money to see Barry Manilow!  I like Copa Cabana but not $300 worth.

Tuesday, June 15, 2010

I'd like to buy a vowel please!

I took this picture of The Palazzo while I was a passenger in a car driving down the strip.  It actually turned out better than I expected.  I don't have any funny or witty stories to go with this photograph unfortunately.  The Palazzo is where I learned to play craps and where I gambled for the first time.

The Palazzo cost $1.8 billion dollars to build and offers the largest standard accommodations on the strip with rooms that are 720 square feet.

Now that I think about it, I do have a fun story for this casino!  Nick and I actually went to a taping of Wheel of Fortune at The Palazzo in the summer of 2009.  We were told to arrive early if we wanted to get good seats so we showed up three hours before the taping.  Well let me tell you, if you ever go to a Wheel of Fortune taping, the later you get there the better.  They seated the auditorium from back to front.  So even though we had stood in line for hours, we sat on the VERY last row.  You couldn't even see us waving on TV we were so far away.  Not cool Pat Sajak, not cool.

Sunday, June 13, 2010

Birthday Cards

These are my newest birthday card creations.  Enjoy!


Let them eat cake!

I promise this is my last baby shower post. I have never been a big cake eater.  Unless it was Ree's chocolate cake.  Yum.  I could go for some of that right now!  Anyway, we threw a baby shower for a small group of ladies that don't eat that many sweets.  I figured it would be a waste of money to make a massive sheet cake.  A lot of times at weddings and birthday parties I just want to try a bite or two of the cake and feel guilty throwing the rest of it away.  I have discovered the perfect solution to this problem, cake pops!

They are basically bite sized pieces of cake on a stick and dipped in chocolate.  They look fancy and got lots of compliments at the shower.  Enjoy the recipe!

Cake Pop Recipe:
-Prepare one 9x13 inch cake.  You can use any kind that you want, homemade or boxed.  I made a yellow cake from scratch.  Allow the cake to cool.  Then crumble the cake into pieces in a large bowl.
-Add about half a can of prepared frosting or you can make your own from scratch.  I made home made cream cheese icing.  Add the frosting to the crumbled cake and mix thoroughly.
-Refrigerate this mixture for 2 hours or stick it in the freezer for one hour if you are in a hurry.
-Take the mixture out of the freezer and roll into one inch balls.  Place balls on cookie sheet covered in wax paper.  Stick candy stick in the top of the cake pop so that the stick is sticking straight up.  When have you finished doing this with all of the cake mixture, place the cake pops back in the freezer.  (I left mine in for about an hour...the longer you leave them in, the easier it will be to coat them in chocolate.)
-As far as the outside coating goes, I used dark chocolate melting chips I purchased at Michael's.  I melted them in a double boiler and started dipping the cake pops in it.  Place the chocolate dipped cake pop in a Styrofoam block to cool.
-You can decorate the outside with sprinkles or a different colored icing if you wish.

Wednesday, June 9, 2010

Lazy Fur Baby


Bristol spent most of the evening outside with me.  I was in the pool and he was tip-toeing around the pool trying to figure out what I was doing without getting his paws wet.  Apparently that wore him out because he went over to his food bowl and plopped down.  He proceeded to eat his dinner laying across the tile and carpet.  How did he get so lazy???

Don't worry, he wasn't over heated :)


Diaper Wreath

You've probably heard of a diaper cake before but have you heard of a diaper wreath?  They are simple to create and make a unique baby gift!  Here is a picture of the diaper wreath I made for my friend Stephanie for her baby shower.

I bought a wire wreath frame at Michael's for $2.00.  I wrapped the diapers around the wire frame and tied each one with a clear elastic band.  Then you just tie on any gifts or decorations you want to give to the new mom and baby.  So easy and unique!

Tuesday, June 8, 2010

Melts in your mouth, not in your hand.

I hadn't made home made mints before this past week.  They are easy to make and taste like they took hours to make.  These are cream cheese mints that taste great straight out of the freezer.

Ingredients:
-4 ounces cream cheese
-1 lb powdered sugar
-1/2 tsp peppermint extract
-Desired food coloring (I used green)
-Milk


-Mix together all ingredients.
-Add just enough milk to make the dough a hard fondant.
-Chill mixture in the refrigerator.
-Once mixture is chilled, roll into small balls that will fit in your candy mold.  I used a plastic mold from Michael's.
-Roll balls in granulated sugar and press down into mold and then pop candies out.
-Store the candies in the fridge or freezer.

Yummy Cookies

These cookies are delicious! I made them for the baby shower last weekend and wanted to share the recipe.
Vanilla-Almond Sugar Cookies:
Ingredients:

3 cups unbleached, all purpose flour
2 tsp baking powder
1 cup sugar
2 sticks butter
1 egg
1/2 tsp pure vanilla extract
1/2 tsp pure almond extract

Preheat oven to 350 degrees.
-Combine the flour and baking powder, set aside.  Cream the sugar and butter.  Add the egg and extracts and mix.  Gradually add the flour mixture and beat just until combined.
-Roll onto a floured surface and cut into shapes.  Place on parchment lined baking sheets and bake for 10-12 minutes.  Let cookies sit on cookie sheet for a few minutes then transfer to a cooling rack.

I even made cookies shaped and decorated like onsies for party favors.  My friend packaged them up and we gave them out at the shower.  They turned out super cute!

As far as icing the cookies go, you could use royal icing if you want but I personally don't care for the flavor of it.  I found a great recipe that's easy to make and drys hard and shiny.

Sugar Cookie Icing:
-1 cup confectioner's sugar
-2 teaspoons milk
-2 teaspoons light corn syrup
-1/4 teaspoon almond extract (you could also use vanilla extract)
-Assorted food coloring

Directions:
-In a small bowl, mix together the confectioner's sugar and milk until smooth.  Beat in corn syrup and almond extract until icing is smooth and glossy.  If the icing is too thick, add more corn syrup to thin out the icing.
-Divide into separate bowls and add the desired food coloring.  I used food coloring gels that I bought at the craft store in the baking section.  You could probably use regular food coloring though.
-Dip, brush, and decorate the cookies as you wish.  Be sure to let the layers dry before adding a new layer/new color.


Saturday, June 5, 2010

Caution: Contents not Edible

Nutrition Facts:
-Fat Free
-Calorie Free
-No Trans Fats
-High in Fiber

If only I could find an edible cake with the same nutritional value!  I made this diaper cake for a baby shower for a very close friend here in Las Vegas.  The three layers of diapers are held together by a plastic dowel in the middle.  I have no idea how many diapers I used but I'd guess around 50.

Diaper cakes make great accents for a shower or even just as a gift. It made a wonderful centerpiece today at the shower and was fun to make! The expectant mama doesn't know the sex of her baby so I tried to keep it as gender neutral as possible but still make it cute.  She decorated her nursery in chocolate brown and sage green.  This is the closest thing that I could find to match.  What can I say, I have funky taste.

She's so vain, she probably thinks this post is about her...

This is our two year old terrier mix named Ella.  She likes to stare at herself.  Not just in mirrors, but in windows, glass, and doors.  Basically in anything that reveals her reflection.  She just doesn't understand why the cute puppy in the mirror won't play with her.  She sits by the mirror and paws at it and whines but that little puppy just won't play with her.

Poor little thing is so confused!